Pages


Showing posts with label diy. Show all posts

Monday, August 17, 2015

DIY: Retro '90s Inspired Notebook

Hey everyone--

So this is a super super easy DIY! I had so much fun decorating my notebook and I think it's a really great way to make a more "serious content" notebook a lot more cheerful. I needed a new notebook to track my daily health patterns and UC symptoms and I decided to make it as fun as possible. I decorated the notebook with sparkles and stickers of all things that make me happy! It's the happiest notebook that I own and helps keep my spirits up no matter what I write inside. You can use your notebook for whatever you like! It definitely doesn't have to be for something serious. However, I think it's a great idea for a notebook that you use often so you are reminded of all the things that make you smile. 

& Yeah I'm a '90s child and I really miss the crazy sticker obsessed products that were popular back in the day so I decided to bring it back!

.. I mean how cute are these stickers? All of them are ban.do, seriously my most favorite store ever! :D
The notebook is also from there. They're just rockin' my world lately.

Try it and tell me what you think!

Have a sweet day!
Christina xx

Supplies: notebook, some really cool stickers, hot glue gun,  gemstones, whatever else makes you happy!

Steps: 1. Make sure your notebook has a background that you like because there will most likely be open spaces! I chose this notebook with tiny polka dots.

2. Cover your notebook in stickers & have fun!

3. Then use a hot glue gun to glue on gems and any other fun pieces that you want on the notebook!

4. Set your notebook aside and let it dry for at least 20 minutes!

Thursday, July 2, 2015

Recipe: Liberty Lemonade

Hey everyone--

Here is a refreshing, patriotic drink recipe just in time for your holiday weekend. It's super simple to make and perfect to share with your friends and family as you celebrate! Give it a try this weekend!

Have a very happy 4th of July everyone! 

Christina xx

Ingredients: Lemonade, Sugar, Frozen Strawberries, Frozen Blueberries 

Steps: 1. Start with lemonade. I used Minute Maid lemonade that I bought already made, but feel free to make your own lemonade to start with.

2. Sweeten the lemonade with sugar. For a punch bowl size of filled lemonade, I used 1 cup of sugar. You can put however much sugar in it as needed to get it as sweet as you want. 
(Skip this step if you don't want to sweeten it)

3.  Next add strawberries.

4. Then add blueberries.

5. Pour your lemonade into a glass and add a straw & enjoy! 

(P.S- Be sure to drink within 24 hours because the fruit can ferment
.. or just wait to add the fruit until you're ready to drink it!
P.S.S- This warning is here because I made this mistake!)

Monday, June 29, 2015

DIY: "Popsicle" Sponges

Hey everyone--

I first saw a "sponge" popsicle on The Jealous Curator Blog. I thought they were so cute and I knew I could make them myself! This is great if you're looking for a fun, fast and cheap DIY project for the summer!

Supplies: Sponges, Popsicle Sticks, Hot Glue Gun Sticks, Hot Glue Gun

Steps: 
1. Put a hot glue gun stick into your hot glue gun and plug it in.

2. Let the gun heat up for a couple minutes before use.

3. Take a sponge and at the bottom of it, in the center, gently pull the sponge in opposite directions to create a hole in the center.

4. Once the hole is there, pull apart the sides of the sponge in different directions (carefully!) and use your finger to make it a bit deeper.

5. Take a popsicle stick and put it into the hole that you created.

6. Continue to push it into the sponge until a good amount is left outside of the sponge to look more like a real popsicle.

7. Take the glue gun and place some glue along the inside edge of the sponge and press it down onto the stick for a few seconds.

8. Flip over the sponge and repeat step 7 to the other side.
(Step 7 and 8 are to close the openings and connect the sponge to the stick)

9. Set aside the sponge and let it dry for at least 20 to 30 minutes.

Once it's dry, you have an adorable popsicle sponge to make cleaning more fun!  

Have a sweet day!
Christina xx


Wednesday, June 24, 2015

Recipe: Ooey Gooey Cookie Sandwiches

Hey everyone--

This yummy recipe is an adapted mix of two that I found on Pinterest:

I wanted to make cookie sandwiches but I wanted to fill them with a strawberry flavored buttercream because I was making them for my sweet boyfriend Fred! Strawberries are his favorite so I wanted to add some strawberry flavor to the sandwiches! I think these are a really yummy sweet treat for the summertime.

Note: These are very gooey and will melt in your hands! So keep some napkins close by!

Have a sweet day!

Christina xx

Ingredients:
Frosting: 1/2 cup + 2 tbsp strawberry puree, 1/2 cup unsalted butter, 1/4 cup salted butter, 2 1/2- 2 3/4 cups powdered sugar, 1/4 tsp vanilla extract
Cookies: 2 cups flour, 2 tsp cornstarch, 1 tsp baking soda, 1/2 tsp salt, 3/4 cup unsalted butter, 3/4 cup light brown sugar, 1/4 cup granulated sugar, 1 egg, 2 tsp vanilla extract, 1 cup mini chocolate chips

Steps:
Frosting: 1. Put the strawberry puree in a small pan and heat mixture over medium-low heat.
2. Stir occasionally and continue to let simmer until it's been reduced by about 2/3 to 3 tsp. This will take about 10 - 15 minutes.
3. Then, pour the puree in a bowl and let freeze until cool.
4. In a bowl, whip unsalted and salted butter together.
5. Mix in 1 cup of powdered sugar.
6. Blend in the reduced strawberry puree.
7. Put in the vanilla extract.
8. Add 1 1/2 cups of powdered sugar and continue to mix until frosting is fluffy.
9. Add an additional 1/4 cup of powdered sugar until you get the perfect fluffiness.

Cookies: 1. In a large bowl, mix the butter together until creamy.
2. Add in the brown sugar.
3. Add in the granulated sugar and mix all together until fluffy.
4. Mix in the egg.
5. Mix in the vanilla.
6. In a separate bowl, mix together the flour, cornstarch, baking soda and salt.
7. Add in chocolate chips and mix for about 5 seconds.
8. Cover dough with plastic wrap and let chill for at least 1 hour, 2 hours preferred.
9. Remove the cookie dough from the refrigerator and let sit at room temperature for 10 minutes.
10. Preheat oven to 350 degrees F.
11. Roll the dough into balls.
12. Bake the dough balls for 8-10 minutes, or until golden brown around the edges.
13. Let the cookies cool for at least 30 minutes.

Then: 1. Sandwich the frosting between two cooled cookies to create the sandwich!
& Enjoy!


Friday, June 19, 2015

Recipe: Gummy-Bear Popsicles

Hey everyone--

I first saw a gummy-bear popsicle recipe on Laurenconrad.com. They looked so sweet and so cute, I knew I had to try some this summer season! On the Lauren Conrad Blog they suggested using coconut water or Gatorade as the liquid, but I used pink lemonade! I love pink lemonade and I adore gummy-bears so I thought they turned out awesome! If you're looking for a fun, easy, summer popsicle recipe, keep reading!

Ingredients: Pink Lemonade, Gummy-Bears, Ice Pop/ Popsicle Mold, Freezer

Steps:

1. Take the sticks/bottoms out of each slot and make sure your ice pop/popsicle mold is clean and ready to go!

2. Pour pink lemonade evenly throughout the mold. Don't fill it to the brim, because dropping the gummy-bears in it will make the liquid rise and you still have to place the stick/bottom back into it too.

3. Drop as many gummy-bears as you'd like in each slot.

4. Place the stick/bottom back into each slot.

5. Put the ice pop mold into the freezer.

6. Leave the mold in the freezer for at least 2 hours to freeze into solid popsicles.

7. After about 2 hours you can take the mold out of the freezer and the popsicles out of the mold. (You might have to jimmy and shake the stick/bottom a bit to get it to come out, but it should be fairly smooth and easy!)

Your yummy gummy popsicles are now ready to be enjoyed and shared!

Have a sweet day!
Christina xx

Sunday, January 19, 2014

January's Treat: Kate Spade Inspired DIY Glitter Watch

Hey everyone!

 Has anyone else been lusting after the gorgeous Kate Spade glitter watches that were all over the web during the holiday season?  I sure have been! As a college student, I'm on a budget that would not allow me to buy the actual Kate Spade watch that I wanted. So, I decided to use a little bit of Mod Podge and loose glitter to create a watch inspired by the Kate Spade glitter watch that stole my heart. If you're in the same boat as me, get out that glitter and follow these 6 simple steps!

Christina xx

Materials: watch, mod podge, paint brush, loose glitter

Instructions: 

1. Dip a paint brush into Mod Podge and coat the straps of the watch. (This project gets a bit sparkly, so if you don't want your surface to be covered in glitter put down a towel or piece of paper.)

2. Sprinkle loose glitter onto the wet Mod Podge.

3. Let the glitter set for just a few minutes and then shake off the excess glitter.

4. Next, let the watch dry for a couple of hours.

5.  Then, put a second coat of Mod Podge onto the watch, over the glitter.

6. Wait until the watch is completely dry, then wear it to add a touch of glamour and shine to any look! 

Tuesday, October 29, 2013

October's Treat: "Pumpkin" Candy Apples

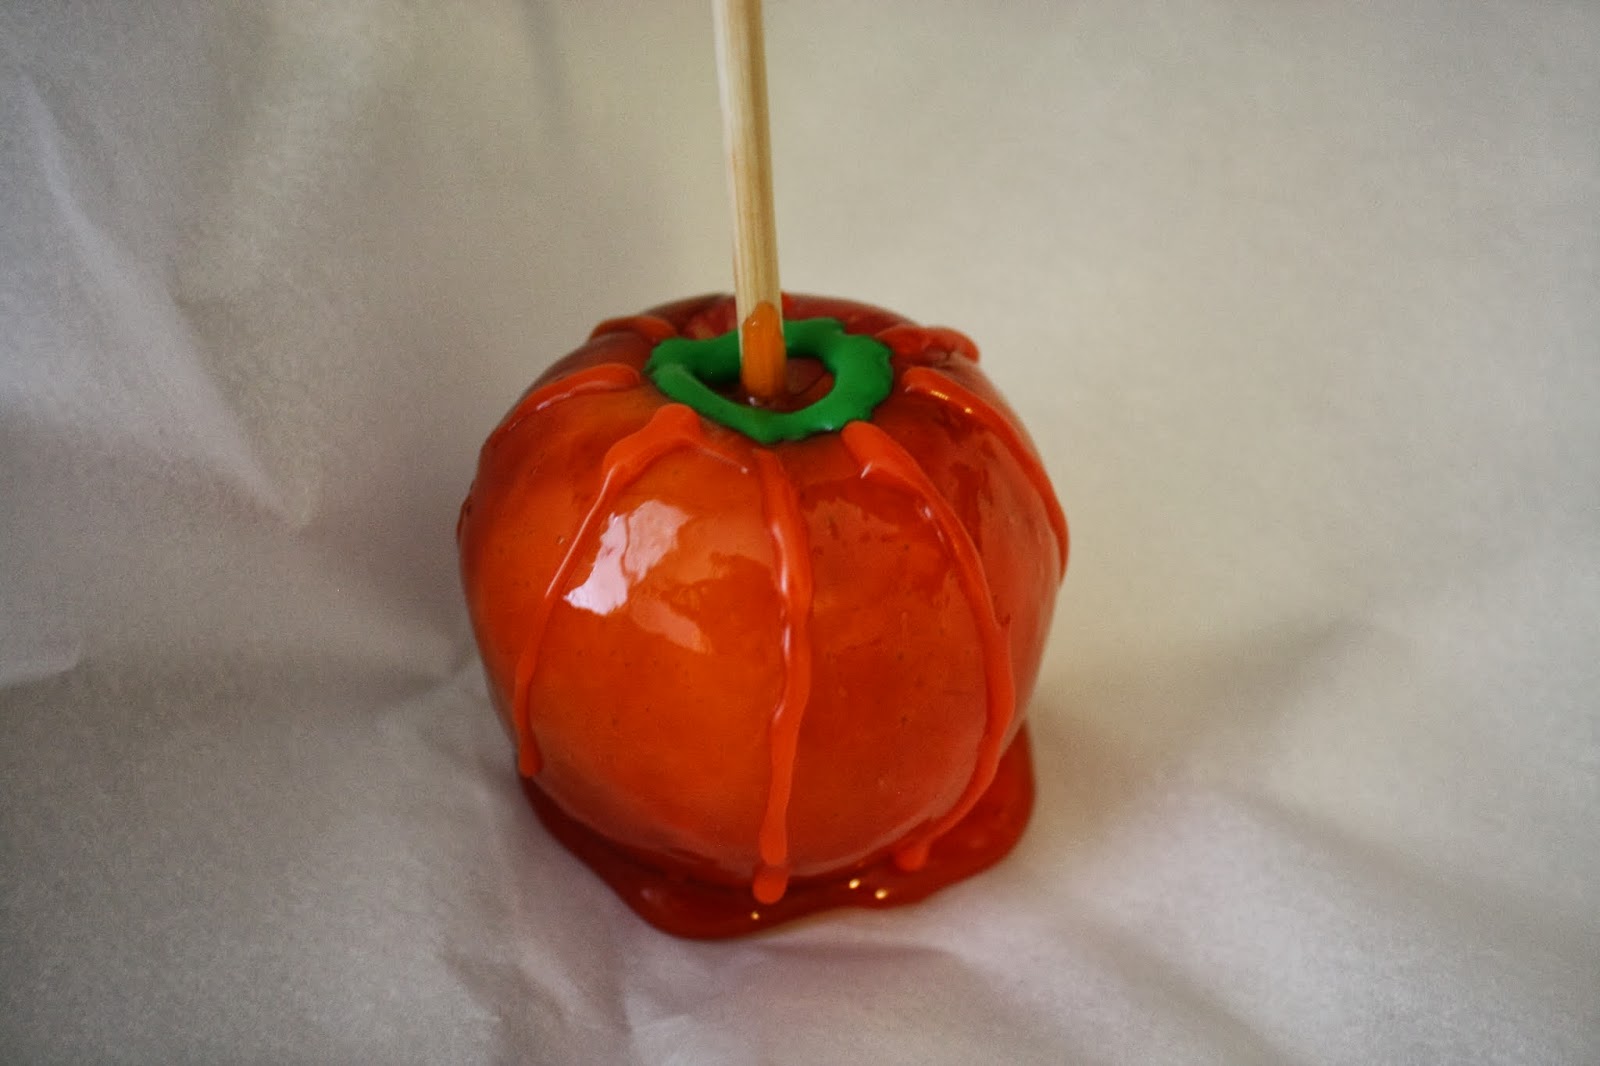
This recipe was supposed to be posted yesterday, but I had to go to the hospital. Nothing serious, I'm just sick! Sorry for the delay. Anyway, I'd never made candy apples until these and I'd always wanted to. I thought that these were adorable. Give me any recipe that mixes apples and pumpkins during the month of October and I'm in. I hope you all enjoy these as much as I did! 

Ingredients: apples, large kabob or popsicle sticks, orange gel food coloring, green and orange frosting, 1 1/2 cup of sugar, 1 cup of water, 1 cup of light corn syrup, parchment paper, candy thermometer 

Instructions: 

1. Prepare by washing the apples and laying down parchment paper onto the plate/container that apples will be placed on. 

2.  Remove the stems from the apples and stick the kabob/popsicle sticks into the center of the apples.

3.  In a pot on stove top, combine sugar, light corn syrup and water.

4. Stir mixture on high heat until it starts to boil.

5. Once mixture is boiling, stop stirring and place candy thermometer into the pot.

6. Once the mixture reaches 285 degrees Farenheit, lower the heat and put orange food coloring into the mix. (How much food coloring you should use really just depends. Start by adding 1/2 tsp and continue to add more to get the color you like.)

7. Dip apples into the candy mixture. Make sure each apple is completely covered. & Dip apples as quickly as possible.

8. Then, let the excess mixture drip off of the apple back into the pot.

9. Next, place the apple on parchment paper and let dry. 

10. Use orange icing to draw lines down the apple, to imitate that of a pumpkin.

11. Then, use green icing to draw a circle around the top of the apple, to imitate a pumpkin's stem and leaves. 

12. Let the frosting on the apples dry and you are finished! Enjoy your "pumpkin" apples with some friends and fall fun!
Christina xxoo